Why Popcorn Ceiling Removal Is Worth the Effort
Popcorn ceiling removal is the process of stripping away the bumpy, textured coating sprayed on ceilings — popular from the 1950s through the 1980s — to reveal a smooth, modern surface underneath.
Here’s a quick overview of how it’s done:
- Test for asbestos — critical for any home built before 1980
- Prep the room — cover floors, walls, and fixtures with plastic sheeting
- Wet the ceiling — spray with water and let soak for 15–20 minutes
- Scrape off the texture — use a wide drywall knife in small sections
- Repair, prime, and paint — patch gouges, apply primer, and finish with flat ceiling paint
Popcorn ceilings were once practical. They hid imperfect drywall joints, absorbed some sound, and went up fast. But today, most homeowners want them gone — and for good reason.
They trap dust, dirt, and odors. They make rooms feel darker and older. And if your home was built before 1980, there’s a real chance the texture contains asbestos — a serious health concern if disturbed without proper precautions.
The good news? With the right approach, removal is a very manageable project. Whether you go the DIY route or bring in professionals, knowing what you’re dealing with before you start makes all the difference.
I’m Michael Catanzaro of Catanzaro & Sons, a family-owned painting company based in Barrington, RI, with decades of hands-on experience in residential painting and historic home restoration — including countless popcorn ceiling removal projects across Rhode Island. In this guide, I’ll walk you through everything you need to know to get this done safely and cleanly.

Basic Popcorn ceiling removal glossary:
Understanding the Risks: Asbestos and Safety First
Before we pick up a scraper or even move a piece of furniture in your Barrington or East Greenwich home, we have to talk about the “A-word”: asbestos. While popcorn ceilings were loved by builders for their fire-retardant properties and acoustic benefits, many of the mixtures used before the late 1970s contained chrysotile asbestos.
According to the Asbestos Exposure and Reducing Exposure guidelines, disturbing these fibers can lead to serious long-term health issues like mesothelioma or asbestosis. In the United States, asbestos was used in sprayed ceiling coatings from roughly 1935 until 1978. However, even homes built in the early-to-mid 1980s might still have it, as contractors were allowed to use up their existing stocks.
If your home was built before 1986, you must assume there is a risk. Asbestos in these ceilings usually makes up about 1% to 10% of the mixture. It’s not dangerous if it’s sitting there undisturbed, but the moment you start scraping or sanding, those microscopic fibers become airborne.
Testing for Asbestos in Popcorn Ceiling Removal
You cannot tell if a ceiling has asbestos just by looking at it. It looks exactly like the non-toxic stuff. To stay safe, you have two options:
- Purchase a DIY Test Kit: These are available at most hardware stores in Rhode Island for about $35–$50. You’ll scrape a small, dime-sized sample into a plastic bag (while wearing a mask and misting the area with water first!) and mail it to a lab.
- Hire a Professional: You can have an expert come to your home to take samples and send them to an NVLAP approved testing center.
If the test comes back positive (anything over 1% is considered “asbestos-containing material”), we strongly recommend stopping right there. Professional asbestos abatement is the only legal and safe way to remove it. Alternatively, you can choose to “encapsulate” it by covering the ceiling with a new layer of drywall, which we will discuss later.
Essential Protective Gear
Even if your test is negative, popcorn ceiling removal is a messy, dusty “nasty task.” You don’t want to be breathing in old drywall dust, spider webs, or 40-year-old dust bunnies. We recommend the following gear:
- Dual-cartridge respirator: A simple paper mask won’t cut it. You need a respirator that fits snugly to your face.
- Safety goggles: Not just glasses—get the ones that seal around your eyes. Falling wet popcorn in the eye is no fun.
- Disposable coveralls: Unless you want to throw your clothes away afterward.
- Gloves: To protect your hands from moisture and sharp scraper edges.
- Sturdy Ladder or Scaffold: For rooms with high ceilings, like those beautiful entryways in the East Side of Providence, a scaffold is much safer than a ladder.
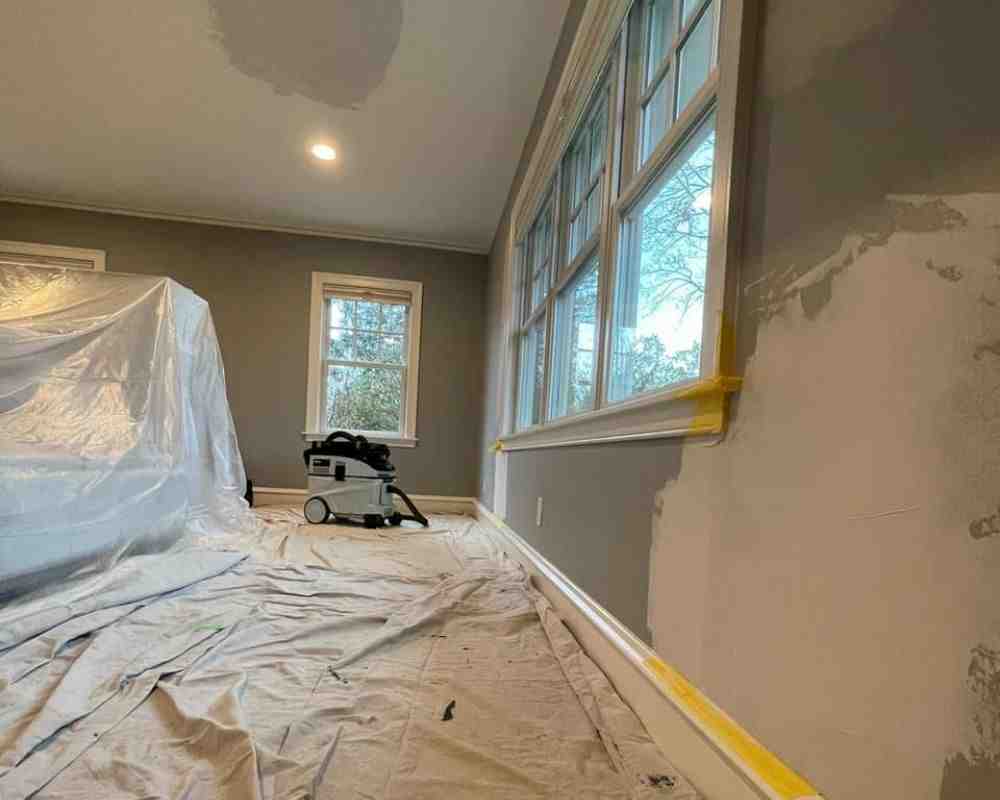
Preparing Your Home for a Mess-Free Project
If you’ve ever seen a DIY project gone wrong, it usually starts with poor preparation. When you wet down a popcorn ceiling and scrape it, it turns into a heavy, gray sludge that sticks to everything. If you do it dry, it creates a cloud of dust that will find its way into your toaster, your closets, and your HVAC system.
At Catanzaro & Sons, we spend more time prepping the room than we do actually scraping. Here is how to ensure your home stays protected.
Protecting Floors and Walls
First, clear the room entirely. If you have heavy furniture that can’t be moved, push it to the center and wrap it tightly in plastic.
We recommend using heavy-duty plastic sheeting for the floors. While we love canvas dropcloths for traditional painting, they are a nightmare for popcorn ceiling removal. The wet sludge will soak right through canvas and ruin your hardwood or carpet. Use 6-mil plastic and overlap the seams by at least 12 inches, securing them with duct tape.
Don’t forget the walls! Use painter’s tape to hang thin plastic sheeting from the top of the walls all the way down to the floor, creating a “envelope” that catches all the debris. This makes cleanup as easy as rolling up the plastic and tossing it in a contractor bag.
Managing Debris and Dust
Before you start, turn off your HVAC system and seal the vents with plastic. You don’t want the dust being sucked into your furnace and blown into the rest of the house.
Also, water and electricity are a bad mix. Turn off the power to the room at the breaker box. Remove light fixtures and wrap the remaining wires in plastic and electrical tape. If you need light to work, use a portable work light plugged into an extension cord from another room.
For more tips on how we handle large-scale home updates, check out our interior-painting-services-complete-guide.
Top DIY Methods for Popcorn Ceiling Removal
There isn’t just one way to get rid of that “cottage cheese” texture. Depending on whether your ceiling has been painted and how much effort you want to put in, you can choose from these three primary methods:
| Method | Tool Requirements | Skill Level | Mess Factor | Time Investment |
|---|---|---|---|---|
| Wet Scrape | Pump sprayer, scraper, plastic | Beginner | High (Wet) | Moderate |
| Drywall Sander | drywall sander, shop vac | Intermediate | Moderate (Dusty) | Fast |
| Cover-up | 1/4″ Drywall, screws, tape | Advanced | Low | High |
The Wet Scrape Method: Step-by-Step
This is the most common DIY method because it’s inexpensive. All you really need is water and a scraper.
- The Mixture: Fill a pump sprayer with warm water. A “pro tip” we often use is adding a few tablespoons of liquid fabric softener. This helps the water penetrate the texture more effectively.
- The Soak: Spray a 4×4 foot section of the ceiling. You want it damp, but not dripping wet (too much water can damage the drywall underneath). Wait about 15–20 minutes. If the water hasn’t soaked in, spray it again.
- The Scrape: Use a six-inch drywall knife or a specialized popcorn scraper. Hold it at a shallow angle to avoid gouging the drywall. If the texture is properly saturated, it should come off in satisfying, buttery sheets.
- The Corners: Use a smaller putty knife for the edges where the ceiling meets the wall.
Using a Drywall Sander for Popcorn Ceiling Removal
If you hate the idea of wet sludge, using a drywall sander is a great alternative. This tool is essentially a sanding disk on a long pole hooked up to a powerful shop vac.
As you sand, the vacuum sucks up the majority of the dust. We recommend starting with a coarse 80-grit sandpaper to knock down the heavy texture, then switching to a 150-grit for a smooth finish. The trick is to keep the sander moving and perfectly flat against the ceiling to avoid swirl marks or deep gouges. While this is a serious arm workout, it often leaves a smoother surface than scraping does.
Covering with New Drywall
Sometimes, the popcorn is just too stubborn—usually because it’s been painted over multiple times. Or, perhaps your ceiling has asbestos and you want to bury it safely.
In these cases, we often recommend installing 1/4-inch “ceiling-grade” drywall right over the existing texture. You’ll need to use a stud finder to locate the joists and use long screws to secure the new sheets. While this results in a small loss of ceiling height (about a quarter inch), it provides a perfectly flat, brand-new surface without the mess of scraping. It’s a great option for historic homes in Bristol or Narragansett where the original plaster might be too fragile for wet scraping.
Finishing Touches: Repairing and Painting Your New Ceiling
Once the popcorn is gone, you’ll likely realize why it was put there in the first place: the drywall underneath is probably a mess. Builders used popcorn to hide poorly taped joints, nail pops, and uneven surfaces.
Dealing with Painted Popcorn Ceilings
If your popcorn ceiling has been painted, the wet scrape method might not work. Paint acts as a waterproof seal, preventing the water from soaking into the texture. You can try a “dry scrape” to knock off the tops of the bumps, then apply water, but it’s much harder work.
Some homeowners use chemical strippers, while others prefer to use a product like Texture Effects by Modern Masters to skim coat right over the painted bumps, creating a smooth, plaster-like finish without any scraping at all.
Priming and Painting for a Professional Look
After scraping, you must repair any gouges with joint compound. Once the repairs are dry, sand them smooth and wipe away the dust with a damp cloth.
Now comes the most important part: Priming. Raw drywall and old joint compound soak up paint like a sponge. We recommend a high-build primer to help level out any remaining minor imperfections.
For the final coat, always use a “Flat” or “Matte” finish. Shiny paint (like semi-gloss) will highlight every single bump and ripple in your ceiling. A flat ceiling paint is designed to hide those flaws and give you that clean, modern look you’re after. If you’re wondering about the cost-to-paint-walls or ceilings in your specific home, it often depends on the height and condition of the surface.
Frequently Asked Questions about Popcorn Ceiling Removal
Can I remove a popcorn ceiling that has been painted?
Yes, but it is significantly more difficult. Because paint seals the texture, water can’t penetrate it. You may need to use a coarse-grit sander or a chemical stripper. In some cases, it’s actually faster and cheaper to just hang new 1/4″ drywall over the top.
How much does it cost to remove popcorn ceilings?
While we don’t provide specific pricing here, DIY removal usually costs between $100 and $500 for tools and materials. Professional removal varies based on the size of the room, the height of the ceilings, and whether asbestos is present. Hiring interior-painting-services ensures the job is done quickly and the finish is perfectly smooth.
Is it better to remove or cover the texture with new drywall?
If your ceiling contains asbestos, covering it with new drywall is often the safest and most cost-effective “encapsulation” method. If there is no asbestos, removal is usually preferred to preserve ceiling height and provide a traditional smooth finish.
Conclusion
Popcorn ceiling removal is one of the most impactful upgrades you can make to your home. It instantly modernizes your space, makes your ceilings look higher, and eliminates a major source of dust and allergens.
While it is a project you can tackle yourself with enough patience and plastic sheeting, it is undeniably a “nasty task” that requires a lot of heavy labor and attention to detail. At Catanzaro & Sons, we’ve spent over 30 years perfecting the art of the smooth ceiling. As a family-owned business, we treat every home in Barrington, Cranston, and Johnston as if it were our own.
We specialize in high-quality residential painting and historic home restorations, and we stand behind our work with a 100% satisfaction guarantee. If you’re ready to say goodbye to those dated bumps and hello to a fresh, smooth look, we’re here to help.
Ready to transform your home? Contact us for a professional estimate today and let our family take care of yours!


